
Audiobiography User Instructions
Audiobiography captures life history in audio and shares it for generations. Imagine if only your grandma had a podcast about her life 🤔 😘. Here's how it works:
⭐️ ⭐️ ⭐️ ⭐️
Getting Started 📲
Step 1 ➡ order Audiobiography online ➡ receive a unique link instantly via email and open it using any device, no app required.

When you purchase Audiobiography, at the same time your order confirmation arrives in email, a separate email arrives with your unique link to launch and start your Audiobiography. This link never expires and you can click on it from any device connected to the internet.
If you've purchased Audiobiography for yourself, click the link and scroll to the bottom of the start page to get started.
⭐️ Pro tip: If you don't see this email in your inbox, check your promotions or spam folders.
If you've purchased Audiobiography for someone else, you have a few different options to deliver it.
Option 1: Forward the email as is to the recipient. They'll click on the link to get started, just as you would have if doing it for yourself.
Option 2: Copy the link and send it some other way. Text, email, social media, etc. All that matters is that your recipient has the link to tap or click on.
Option 3: Print a gift card from the start page. This card comes with a QR code on it. You can give it to your loved one along with a card for example. To get started, they'll simply open their phone camera and scan the QR code which will take them to their unique start page.
Step 2 ➡ go through the setup steps.
Setup is easy. We pull you right through. We'll ask you to name your story, decide if it will be public or private, and provide an email address where we can send periodic questions. If you've never signed up for Audiobiography, you'll sign up along the way. It's super fast and easy.

Step 3 ➡ say hello to your story space.
Once inside, you can add a cover photo and start exploring around. The cards below your photo, title, and player controls will help you know what to do once inside.

Tap the gear icon at the top right to see a whole list of controls for your story.

- Add a custom page
- Audiobiography is limitless. You can add as many of your own pages / questions as you'd like. Our 90 default questions are awesome and create a beautiful arc across a lifetime. But your experiences are yours! Add more questions to your story to make it your own.
- Make your book public or private
- You choose your privacy setting during setup, but you can change it here at any time.
- Change your story title
- Manage your audience
- If your story is public, you won't see this option. If your story is private, this is where you'll come to allow or remove individual's access to your story.
- Download story
- You can download your entire story at any time. When it downloads, all photos, questions, and audio recordings export into an organized folder. We encourage you to download your story and keep a copy locally. Or upload any portions or even all of it to any other platform.
- Rearrange pages
- You can determine the flow of your story. We organize our questions somewhat chronologically, but as you add custom pages, skip pages, etc., it might make sense to rearrange your story to your liking.
⭐️ ⭐️ ⭐️ ⭐️
Recording 🎙
Now that you've got a lay of the land, it's time to record! Let's start by talking about our questions, then we'll jump into the recording controls, etc.
Interview Questions

Your story space comes with 90 pre-curated questions that put you on memory lane. It's much like a prompted journal. Swipe through the question cards below the player controls to reveal each new question. You can can swipe back or forth, finding questions that pique your interest. Come back to any question at any time. You can also delete or edit questions that aren't a match for you. See our full list of questions here.
Answering Questions in Audio
Answer any question by tapping or clicking "Answer Question" at the bottom right of any interview question card (like the one shown above). That will open up the page in your story where you can record, add text, and even add up to ten pictures. This is what it looks like before recordings or pictures are added.

If you'd like to edit the question or page title, tap the gray question bubble (in the image below, it starts with "Grandparents - Who are your..."). That will open up an area to modify anything you'd like about the question or title.

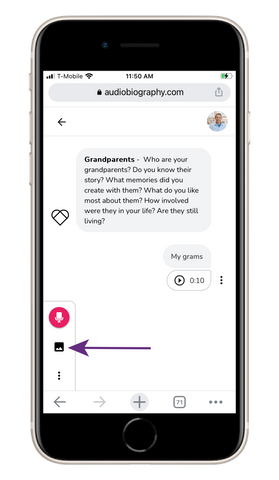
The side menu at the bottom left is where you'll tap to record, add photos, or expand the menu for more options including uploading an audio file, sharing this page with friends and family, or deleting the page altogether.

Here's the menu expanded:

When you're ready to record, just tap or click the red record button.

That will open up the Audiobiography recorder. You'll first seen an intro to the recorder explaining best practices, etc.

Then when you're ready, tap the big red button.

Recording will begin. You can hit pause at any time, and resume when you're ready. The recording will be seamless. Each individual recording is limited to 10 minutes. You'll see the timer. But keep in mind you can do an unlimited number of recordings, each up to 10 minutes long. If you have a long story to tell, you'll simply tell it in segments, and you can title those segments "part 1" "part 2", etc. You can add the title either during this recording step, or after.
Here's what it looks like if you hit pause, which will reveal the resume button.

When you're done recording, simply tap the Save button. You'll be returned to the page where you'll now see the recording and its title. You'll also see three vertical dots next to the recording. Tap to reveal a menu.

From this menu you can give the recording a name, download it, or delete it and start over!

You can add up to ten photos to any episode / page. Tap the photos button in the side menu.
This opens the photo menu. You can either take a photo, or jump into the photo library associated with that device.

You'll choose one photo at a time. I'm kind of digging this one of my grandma (Della) riding her horse.

Once you've selected a photo (or up to ten photos!) you'll see a pencil icon on every photo. This is an edit button. Only you as the owner sees this button. Click to expand it.

When we bring photos into Audiobiography, we crop them square for the best viewing experience, just like Instagram. But sometimes that doesn't work out all that well. Notice with this picture of my grandma and grandpa, cropping took away the top of the picture so we can't see their beautiful faces. No worries though, I'll just tap the aspect ratio button to restore the picture's original dimensions.
You should look through all photos uploaded to make sure they are cropped for the best viewing experience.

Here's what it looks like after restoring the original dimensions. Much better!

As your story takes shape, each page (or episode if you will) appears below the main player controls. You can think of Audiobiography as a personal podcast builder. Your entire story is the podcast. Each individual page is an episode.

The player controls (Play and Shuffle) sit right below the profile picture. Tap whichever one suits your fancy! Tapping play will auto play all recordings in order. Shuffle will, as you guessed it, shuffle through the recordings. This can be a fun way to listen.

⭐️ ⭐️ ⭐️ ⭐️
Sharing ❤️
Audiobiography can be shared with friends and family anywhere in the world. Tap the share button up top. This will reveal many sharing methods for your device.

In my case, I'm going to choose to share via text. This could have been to a single person, or a whole group.

The link is unique and will land the person you shared with, right at your story. If they've never logged in, they'll need to create an account. It's fast and free.

This tutorial was shown using Chrome on an iphone, but you can use any connected device. Laptop. Desktop. Tablet. Or any smartphone. And you can switch between devices all you want. Just access your account on the device you are currently working from.
⭐️ ⭐️ ⭐️ ⭐️
That's it! 😀 You'll feel the magic after your first recording.
If Audiobiography is for yourself, we hope you enjoy the trip down memory lane. If this is for someone else, our promise is you will learn things you never knew and grow closer than you ever would have without it. ❤️
Thanks from all of us,
- The Team at Audiobiography